Home > GCP > Writing all the events
The GCP Event Writer is a Cloud Function that subscribes to Speedtest Event messages on a Pub/Sub topic and writes them as rows in a BigQuery table.
Suggested implementation
Cloud Functions can be written either as Node.js >= 12 or Python >= 3.7.0, we suggest that you use Python.
As previously described, the Event Writer will receive messages in the following format.
{
   "user": "STRING",
   "device": "NUMBER",
   "timestamp": "NUMBER", // epoch time in ms
   "data": {
        "speeds": {
            "download": "NUMBER",
            "upload": "NUMBER"
        },
        "client": {
            "ip": "STRING",
            "lat": "NUMBER",
            "lon": "NUMBER",
            "isp": "STRING",
            "country": "STRING" // (ISO 3166-1_alpha2)
        },
        "server": {
            "host": "STRING",
            "lat": "NUMBER",
            "lon": "NUMBER",
            "country": "STRING", // (ISO 3166-1_alpha2)
            "distance": "NUMBER",
            "ping": "NUMBER",
            "id": "STRING"
        }
    }
}
When the Event Writer receives a message, it should write the content of the message to a table in BigQuery.
Versioning the code
As with all other code, you probably want to version your code, so start off by creating a new repo named gcp-event-writer, either on GitHub, or just locally.
Development guide
Setting up the Python environment
A Python project often defines its dependency libraries in a file called requirements.txt. This file is used by the pip tool to install
the dependencies. The pip tool is a popular package manager for Python, and is included in every Python version since 3.4. As you should have installed
Python3 as part of the prerequisites, you should have pip installed already.
It is common to use a virtual environment when developing Python code. A virtual environment is a directory that contains a Python installation for a specific project and has its own set of libraries. If you use a virtual environment manager like Conda or Poetry, you should make a new environment for this repo. If not, the system Python installation or the standard one downloaded should be fine.
For this Cloud Function, the only dependency library we will need is the GCP BigQuery library, called google-cloud-bigquery.
Go ahead and create the requirements.txt file and add google-cloud-bigquery to it. We then install the dependency by
running python3 -m pip install -r requirements.txt.
Rigging the project for Cloud Functions
The Cloud Function Python runtime expects a file called main.py to be present in the root of the project. This file can call functions in
other files, but is always the entry file for the function. The entry function within that file is configurable in the deployment.
In addition, Cloud Functions will look for the requirements.txt file in the root of the project, and install the dependencies listed before running
the function.
Let’s start by making the main.py file.
import json
import base64

def main(event, context):
    """Triggered from a message on the speedtest Cloud Pub/Sub topic.
    Args:
        event (dict): Event payload.
        context (google.cloud.functions.Context): Metadata for the event.
    """

    # Decode from byte array
    pubsub_message = json.loads(base64.b64decode(event['data']).decode('utf-8'))
Notice how the received event is processed through base64.decode before it is read with the json library. The event.['data']
value is a base64 encoded string of the published message. PubSub will always encode messages down to byte arrays before sending them,
so decoding is needed before further use.
An important concept to understand with how Cloud Functions are executed is that they are only allocated compute time as long as they are running. As soon as the function returns something the function will be terminated.
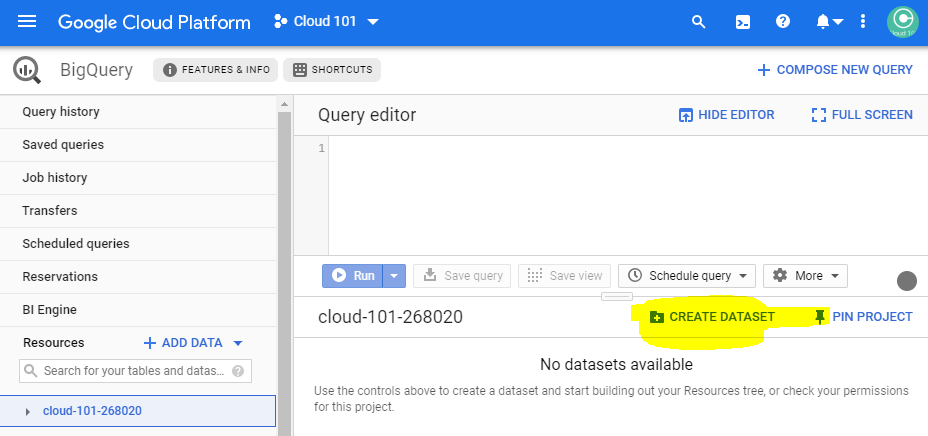
A table in BigQuery
Navigate to console.cloud.google.com/bigquery and create a new BigQuery dataset named speedtest. We recommend choosing a location close to your Cloud Run instance, eu (multiple regions in European Union)
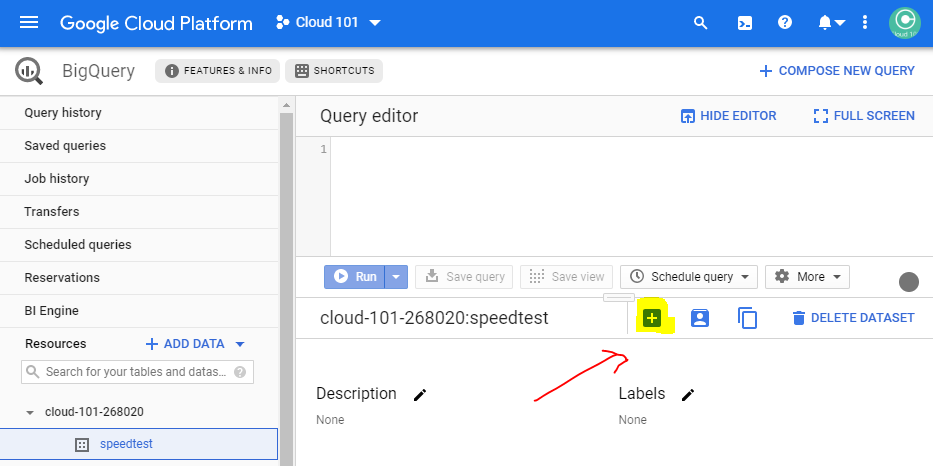
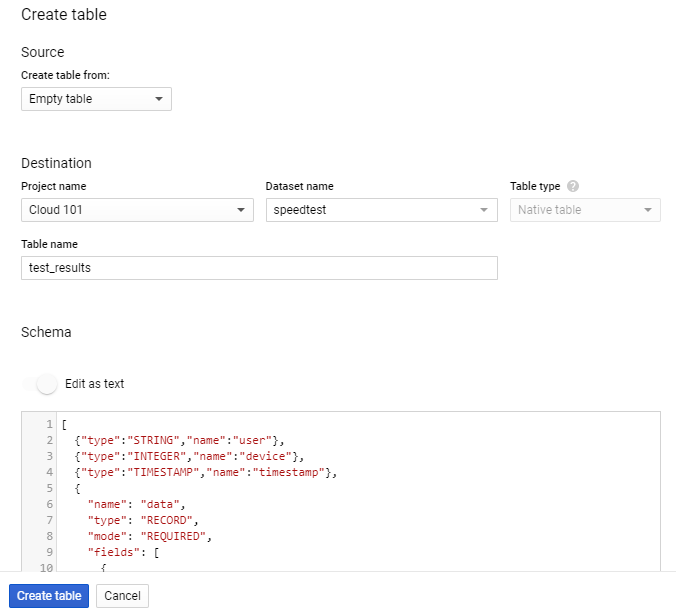
Then create a table named test_results in the created dataset, using either the suggested schema or your own.
If you want to use the suggested schema, just paste the following schema in as text when creating the table.
[
  {"type":"STRING","name":"user"},
  {"type":"INTEGER","name":"device"},
  {"type":"TIMESTAMP","name":"timestamp"},
  {
    "name": "data",
    "type": "RECORD",
    "mode": "REQUIRED",
    "fields": [
      {
        "name": "speeds",
        "type": "RECORD",
        "fields": [
          {
            "name": "download",
            "type": "NUMERIC",
            "mode": "NULLABLE"
          },
          {
            "name": "upload",
            "type": "NUMERIC",
            "mode": "NULLABLE"
          }
        ],
        "mode": "NULLABLE"
      },
      {
        "name": "client",
        "type": "RECORD",
        "fields": [
          {
            "name": "ip",
            "type": "STRING",
            "mode": "NULLABLE"
          },
          {
            "name": "lat",
            "type": "NUMERIC",
            "mode": "NULLABLE"
          },
          {
            "name": "lon",
            "type": "NUMERIC",
            "mode": "NULLABLE"
          },
          {
            "name": "isp",
            "type": "STRING",
            "mode": "NULLABLE"
          },
          {
            "name": "country",
            "type": "STRING",
            "mode": "NULLABLE"
          }
        ],
        "mode": "NULLABLE"
      },
      {
        "name": "server",
        "type": "RECORD",
        "fields": [
          {
            "name": "host",
            "type": "STRING",
            "mode": "NULLABLE"
          },
          {
            "name": "lat",
            "type": "NUMERIC",
            "mode": "NULLABLE"
          },
          {
            "name": "lon",
            "type": "NUMERIC",
            "mode": "NULLABLE"
          },
          {
            "name": "country",
            "type": "STRING",
            "mode": "NULLABLE"
          },
          {
            "name": "distance",
            "type": "NUMERIC",
            "mode": "NULLABLE"
          },
          {
            "name": "ping",
            "type": "NUMERIC",
            "mode": "NULLABLE"
          },
          {
            "name": "id",
            "type": "STRING",
            "mode": "NULLABLE"
          }
        ],
        "mode": "NULLABLE"
      }
    ]
  }
]
Implementing the insertion into BigQuery
Now we are ready to implement the insertion of the message data to our newly created table. We will use the BigQuery Python library to do this.
Start by importing all libraries we need, and some constants declaring your GCP project, dataset and table.
import json
import base64
import datetime
from google.cloud import bigquery

# Project ID
project_id = "sfl-cloud-101" # Replace with your project id

# Make BigQuery client
bq_client = bigquery.Client(project=project_id)
table_id = f"{project_id}.speedtest.test_results"
Now we want to parse the message data and insert the result to BigQuery.
def main(event, context):
    """Triggered from a message on the speedtest Cloud Pub/Sub topic.
    Args:
        event (dict): Event payload.
        context (google.cloud.functions.Context): Metadata for the event.
    """

    # Decode from bytearray
    pubsub_message = json.loads(base64.b64decode(event['data']).decode('utf-8'))

    # Convert timestamp to ISO format
    pubsub_message['timestamp'] = datetime.datetime.fromtimestamp(int(pubsub_message['timestamp'])).isoformat()

    # Insert to bq
    errors = bq_client.insert_rows_json(table_id, [pubsub_message])

     if errors != []:
        print("Message processing failed. Error:", errors)
    else:
        print('Message processed.')
Note that the timestamp field from the received message is converted to ISO format before being inserted to BigQuery. BigQuery expects a
timestamp in a string format, and not a raw integer value.
Also note that the insert_rows_json method returns a list of errors, if any. If the list is empty, the insertion was successful.
If not, we print the error message.
With all that done, we are ready to deploy gcp-event-writer to GCP and see if it works.
Deploying the Event Writer
To deploy gcp-event-writer to Google Cloud Platform you’ll need to use the terminal command gcloud functions deploy:
$ gcp-event-writer> gcloud functions deploy processSpeedtestEvent --trigger-topic speedtest --entry-point main --runtime python310 --region europe-west1

API [cloudfunctions.googleapis.com] not enabled on project
[1050850001017]. Would you like to enable and retry (this will take a
few minutes)? (y/N)?  y
...
API [cloudfunctions.googleapis.com] not enabled on project
[1050850001017]. Would you like to enable and retry (this will take a
few minutes)? (y/N)?  y
...
Deploying function (may take a while - up to 2 minutes)...done.
...
status: ACTIVE
timeout: 60s
updateTime: '2020-02-13T03:58:15Z'
versionId: '2'
Deploying a new Cloud Function takes a few minutes, so while we wait, lets have a look at what the different parameter to gcloud functions deploy are.
processSpeedtestEvent is the name the function will have in your GCP project.
The --trigger-topic flag is used to specify the Cloud Pub/Sub topic to trigger the function. In our case, it is the speedtest topic created earlier.
The --runtime python310 flag specifies that the function will be executed using Python 3.10.
The --entry-point flag is used to specify the function name to run when triggered. In our case, it is main.
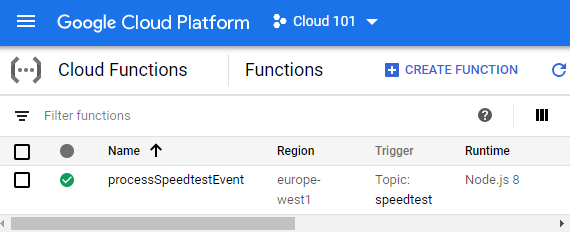
When you’re done
When the deployment is complete, you can view your new function at console.cloud.google.com/functions.
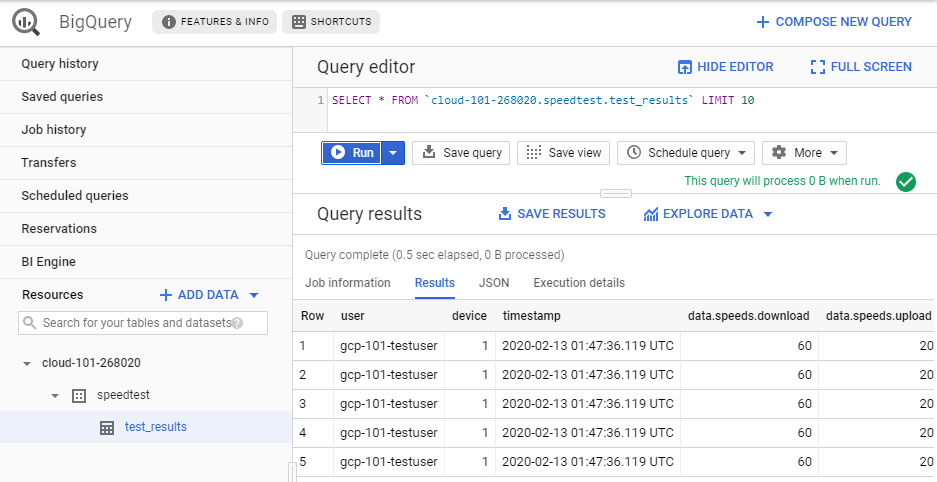
Then for the most exiting part. POST a few speedtest results to gcp-speedtest-api and check if the event writer actually is able to write the test results to BigQuery.
What’s next?
You now have a system with an API that can receive speedtest results, and a system for storing these results in Big Query. Next we’ll create a logger so we can get some real results.